Boards are really popular and useful. To create more advanced UI controls in MDriven Turnkey AngularJS, you can study how this Trello-like board is constructed. In this video, we show you how to add a board to your MDriven Turnkey application and fill it with any important info in your domain model.
To make your experience smooth, we set the main tags mentioned in the video to the right bar menu of this mini-player. Choose an interesting subtitle on the list and immediately get to the exact theme navigation item place in the video. Now you can pick any topic to be instructed on without watching the whole video.
Installation
To develop something like this, it is beneficial to install MDriven Turnkey locally. This way, you can change and see the effect without flipping a lot of files back and forth.
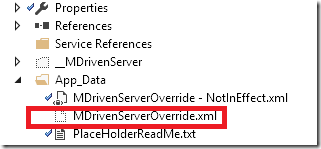
One important ability you may want to maintain is to continue to use the data in the cloud – but still have the Turnkey web app locally. I use this ability all the time to debug and develop Turnkey. You can use it when you develop page overrides and advanced controls: MDrivenServerOverride.xml
The file MDrivenServerOverride.xml is placed in your App_Data folder and has this format:
<?xml version="1.0" encoding="utf-8"?>
<root>
<MDrivenServerOverride MDrivenServerPWD="----yoursecretpwd---">https://YourMDrivenTurnkeyApp.azurewebsites.net/__MDrivenServer</MDrivenServerOverride>
</root>
Adding a file like this allows you to move where MDriven Turnkey should go to find its MDriven Server. Normally, the MDriven Server is placed in a sub-application to the Turnkey-application in a folder named __MDrivenServer (double underscores). But this way, I can use a local Turnkey app – and point out the MDrivenServer for the cloud app.
Running the MDriven Turnkey in Visual Studio
Download and import the MDriven Turnkey in your local IIS – or use IIS Express. Then, open the website in Visual Studio.
- Make sure you have the hang of the SSL certificate for your local host or whatever address you will be using.
- Enable SSL on site.
- Add the MDrivenServerOverride file to your App_Data.
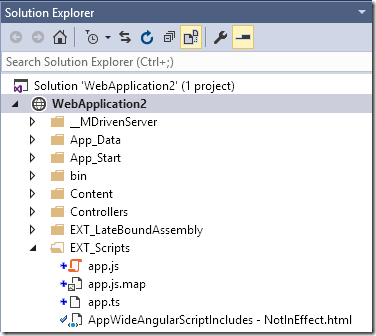
On the website, you will find a folder named EXT_Scripts. This is where we want to keep our custom scripts.
Also, please notice the “AppWideAngularScriptIncludes – NotInEffect.html” file. Whenever you see these “- NotInEffect” files, it means that you should create a copy of that file and remove the “- NotInEffect” and it will have some meaning. The meaning of the file is documented in the file you copied.
This file has this content: In this article, we are going to add this to the AppWideAngularScriptIncludes file:
<script src="/EXT_Scripts/Board.js"></script>|

The application will expect to find a Board.js file in EXT_Scripts and we will get to this soon.
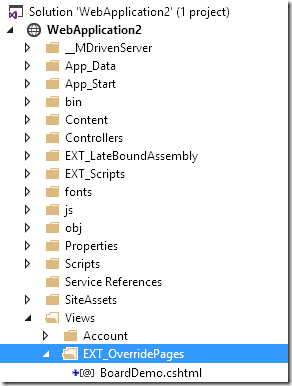
We will also need some markup to replace the Turnkey standard UI. We put this override markup in the EXT_View Folder.
For things to work in my view that I will name BoardDemo, I will need to add a BoardDemo.cshtml in that folder.
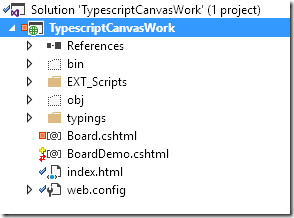
To get these files in the correct place but still separate them from the MDrivenTurnkey website, I will create a separate project. Open a new instance of Visual Studio and create a TypeScript-project (TypeScript is important since Javascript will probably make you explode out of frustration):
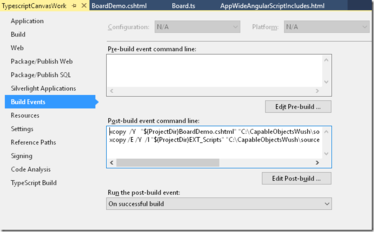
In this project, I will set up a post-build event that copies the resulting BoardDemo.cshtml and Board.js files to the correct places in my Turnkey web app:
xcopy /Y “$(ProjectDir)BoardDemo.cshtml” “C:\CapableObjectsWush\source\StreamingApp\WebApplication2\Views\EXT_OverridePages\”
xcopy /E /Y /I “$(ProjectDir)EXT_Scripts” “C:\CapableObjectsWush\source\StreamingApp\WebApplication2\EXT_Scripts”
This way, you can separate your control development and have it in SVN or Git on its own.
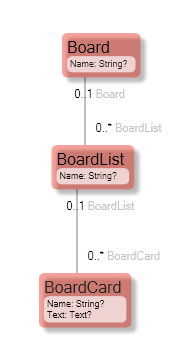
The Model
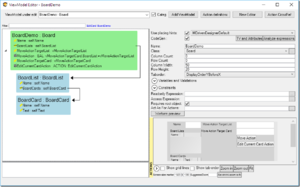
And a ViewModel – called DemoBoard:
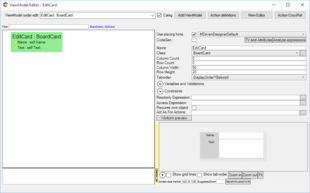
We also add a ViewModel that we will use for editing a BoardCard:
The Markup Override
@{ Layout = null; }

<h3>{{root._ViewModelPresentation}}</h3>

<style>

                        .boardlist {
                       vertical-align: top;
                     }

                     .boardheader {
                       font-weight: bold;
                       font-size: 1.20rem;
                       background-color: seagreen;
                       text-align:center;
                       color:white;
                     }

                      .card {
                       vertical-align: top;
                       background-color: mediumpurple;
                       margin: 2px;
                       border-radius: 12px;
                       border: 2px solid purple;
                       padding: 6px;
                     }

                      .cardname {
                       font-weight: bold;
                     }

                     .cardtext {
                       font-size: 0.90rem;
                       word-wrap: break-word;
                     }

                    .rotateWhileMove {
                       -webkit-transform: rotate(7deg);
                       -moz-transform: rotate(7deg);
                       -ms-transform: rotate(7deg);
                       -o-transform: rotate(7deg);
                       z-index:1000;
                     }

                     .myHorizontalbut {
                       height: 24px;
                       width: 90px;
                       position: relative;
                       padding: 2px;
                       display: inline-block;
                       margin: 2px;
                     }

                      </style>
<div id="theDivForTheBoard" style="height:300px;" ph-board    vmclassid="{{root.VMClassId}}">
                    <table border="1" align ="center" style="height:100%; width:100%;">
                      <tr>
     <td ng-repeat="boardlist in root.BoardLists" height="20px" width="200px">
        <div class="boardheader">{{boardlist.Name}}</div>
    </tr>

     <tr>
       <td ng-repeat="boardlist in root.BoardLists" class="boardlist" ph-boardlist vmclassid="{{boardlist.VMClassId}}">
         <div ng-repeat="card in boardlist.BoardCards" class="card" ph-card>
                             <div class="cardname">{{card.Name}}</div>
           <div class="cardtext">{{card.Text}}</div>
          </div>
       </td>
     </tr>
   </table>
 </div>

     <button ng-repeat="oneaction in root.VM.StateActions() | orderBy:'+SortKey'"
                           ng-class="oneaction.Class" ng-click="oneaction.Execute(); hidemenu();"
                           ng-disabled="!oneaction.Enable" class="myHorizontalbut">
                     {{oneaction.Presentation}}
</button>

       <img id="loadingAnimation" src="/Content/loadingAnimation.gif" scroll-position="scroll" style="margin-top: 0px;" ng-show="root.VM.Loading()" class="ng-hide">
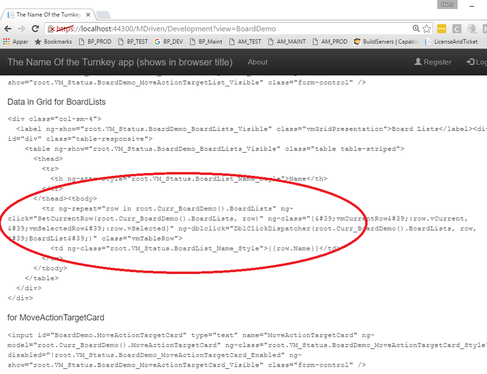
You can look at the page source before overriding it – or use <mysite>/MDriven/Development to get documentation on how we do the standard UI:
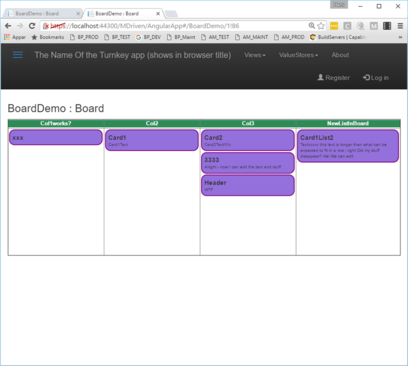
The markup gives this UI on data from my model:
While working on this, I can have the Visual Studio with MDriven Turnkey running and:
☛ I can watch the result in a browser.
☛ I can use my second Visual Studio to change the override markup.
☛ I can compile (this will trigger my post-build action) so that the files are copied into the folders of the running turnkey site.
☛ I can hit refresh in the browser to see the effect of my changes.
The Script
To get the desired behavior to drag a card from one column to another, we need to add Javascript. Luckily, TypeScript is much easier to work with and turns into Javascript upon each save. Use TypeScript - do not hack Javascript directly.
This is the TypeScript source for the Board.ts that will turn into Board.js on each save:
//# sourceURL=EXT_Scripts/Board.js
 /// <reference path="../typings/jquery/jquery.d.ts" />


 function InstallTheDirective(MDrivenAngularApp) {
  console.trace("InstallTheDirective" + MDrivenAngularApp.toString());


  MDrivenAngularApp.directive('phCard', ['$document', function ($document) {
    return {
      link: function (scope, element, attr) {
        var startX = 0, startY = 0, x = 0, y = 0;

        element.attr("vmclassid", scope.card.VMClassId);
        let bl = scope.$parent.boardlist;

        element.css({
          position: 'relative',
          cursor: 'pointer'
        });

        var clicks = 0;
        element.on('mousedown', function (event) {
          // Prevent default dragging of selected content
          event.preventDefault();
          x = 0;
          y = 0;
          startX = event.pageX - x;
          startY = event.pageY - y;
          clicks++;
          if (clicks == 1) {
            setTimeout(function () {
              if (clicks == 1) {
                $document.on('mousemove', mousemove);
                $document.on('mouseup', mouseup);
                element.addClass("rotateWhileMove");

              } else {
                // double click - execute card action
                scope.card.vCurrent = true;
                var theobjectfortheboard = scope.card.VMClassParent.VMClassParent;
                scope.$root.MDrivenViewModel.Execute(theobjectfortheboard.VMClassType(), "EditCurrentCardAction");

              }
              clicks = 0;
            }, 300);
          }
        });

        function mousemove(event) {
          y = event.pageY - startY;
          x = event.pageX - startX;
          element.css({
            top: y + 'px',
            left: x + 'px'
          });
        }

        function mouseup(event) {

          $document.off('mousemove', mousemove);
          $document.off('mouseup', mouseup);
          y = event.clientY;
          x = event.clientX;
          element.removeClass("rotateWhileMove");
          let actiondone: boolean = false;

          var cardid: string = scope.card.VMClassId;
          var theobjectfortheboard = scope.card.VMClassParent.VMClassParent;
          var theboarddiv = $("[vmclassid='" + theobjectfortheboard.VMClassId + "']");
          if (theboarddiv && scope.card && scope.card.VMClassParent) {
            // find all phBoardList elements under this board in DOM
            var alltheboardlists = $(theboarddiv).find("[ph-boardlist]");
            for (let elem of alltheboardlists.get()) {
              var r = (<HTMLElement>elem).getBoundingClientRect();
              if (r.top < y && r.bottom > y && r.left < x && r.right > x) {
                let thelistWeWereDroppedIn: HTMLElement = elem;
                let vmclassid = thelistWeWereDroppedIn.getAttribute("vmclassid");
                let theobjectforthelist = scope.$root.MDrivenViewModel.GetFromVMClassId(vmclassid);
                if (theobjectforthelist !== scope.card.VMClassParent) {
                  theobjectfortheboard.MoveActionTargetList_AsExternalId = theobjectforthelist.VMClassAsExternalId();
                  theobjectfortheboard.MoveActionTargetCard_AsExternalId = scope.card.VMClassAsExternalId();
                  scope.$root.MDrivenViewModel.CallServerAction(theobjectfortheboard.VMClassType(), "MoveAction");


                  actiondone = true;
                }
              }
            }
          }

          if (!actiondone) {
            element.css({
              top: 'auto',
              left: 'auto'
            });
          }
        }
      }
    };
  }]);
 }

console.trace("this file loaded");
InstallTheDirective(angular.module('MDrivenAngularApp'));
The script defines an angularJS directive called “phCard” that is used in the markup. In the markup, you must write “ph-card” (this is the way of angular to).
In short, the script hooks mouse events to allow you to move the card. Once you drop the card, the script ends up in mouse up – and here we find the list you were over on drop. We set a couple of variables and then execute the action “MoveAction”. On the server, the MoveAction-action changes the owner of the card, and the Turnkey will be notified about this change which will end up as the rendering of the card in the new column.

