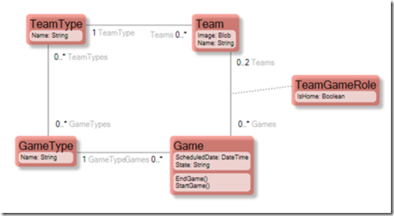
Presented with a model that I got from Rick Weyrauch, which incidentally helps him out as a Hockey Referee when he is not coding, I wanted to create a ViewModel for the use-case “Set up new Hockey game”.
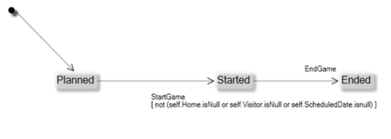
The Game class has a state machine:
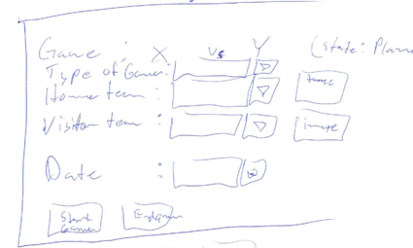
I took a piece of paper and drew the UI I wanted to achieve:
Now I know what the requirements are on the ViewModel since I can see from the drawing what data the ViewModel needs to hold.
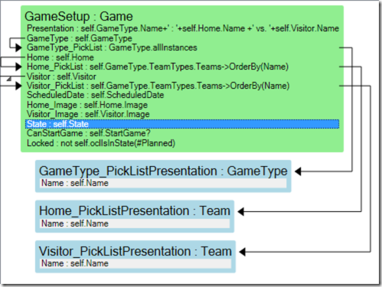
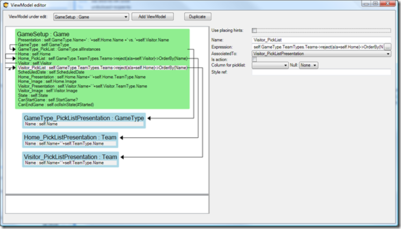
Then I created this ViewModel That I named GameSetup:
Notice that it is just a series of named OCL expressions. Some expressions are nested to other list definitions like Home_PickList that state that if the Game has a picked GameType, then we know what teams can be picked – namely those teams that are associated with that GameType.
I created some test data so that the UI can show something:
Code Snippet
private Game CreateSomeTestData() {

 // Game types
   var gtboys15 = new GameType(_es) { Name = "15 years, Boys" };
   var gtboys16 = new GameType(_es) { Name = "16 years, Boys" };
   var gtgirls15 = new GameType(_es) { Name = "15 years, Girls" };

   // team types
   var ttb15=new TeamType(_es) { Name = "Boys 15 years" };
   var ttb16 = new TeamType(_es) { Name = "Boys 16 years" };
   var ttg15 = new TeamType(_es) { Name = "Girls 15 years" };

   // Valid team-game combinations
   gtgirls15.TeamTypes.Add(ttg15);

   gtboys15.TeamTypes.Add(ttb15);
   gtboys15.TeamTypes.Add(ttg15); // girls can play in boys 15 year
   gtboys16.TeamTypes.Add(ttb15); // 15 year boys can enter 16 year games
   gtboys16.TeamTypes.Add(ttb16);
   gtboys16.TeamTypes.Add(ttg15); // girls can play in boys 16 year


   new Team(_es) { Name = "Brynäs",Image=GetImage(imagebrynäs), TeamType=ttb15 };
   new Team(_es) { Name = "Brynäs", Image = GetImage(imagebrynäs), TeamType = ttb16 };
   new Team(_es) { Name = "Brynäs", Image = GetImage(imagebrynäs), TeamType = ttg15 };

   new Team(_es) { Name = "Luleå", Image = GetImage(imageluleå), TeamType = ttb15 };
   new Team(_es) { Name = "Luleå", Image = GetImage(imageluleå), TeamType = ttb16 };
   new Team(_es) { Name = "Luleå", Image = GetImage(imageluleå), TeamType = ttg15 };

   new Team(_es) { Name = "Djurgården", Image = GetImage(imagedjurgården), TeamType = ttb15  };
   new Team(_es) { Name = "Djurgården", Image = GetImage(imagedjurgården), TeamType = ttb16 };
   new Team(_es) { Name = "Djurgården", Image = GetImage(imagedjurgården), TeamType = ttg15 };

   return new Game(_es)
   {
       ScheduledDate = DateTime.Now
   };
Now I am ready to build the UI.
Code Snippet
<Window x:Class="WPFBinding.Window2"
                  xmlns="http://schemas.microsoft.com/winfx/2006/xaml/presentation"
                  xmlns:x="http://schemas.microsoft.com/winfx/2006/xaml"
                  xmlns:eco="clr-namespace:Eco.WPF;assembly=Eco.WPF"
                  xmlns:ecoVM="clr-namespace:Eco.ViewModel.WPF;assembly=Eco.WPF"
                  xmlns:Controls="clr-namespace:Microsoft.Windows.Controls;assembly=WPFToolkit"
                  xmlns:local="clr-namespace:WPFBinding"
                  xmlns:ecospace="clr-namespace:WPFBinding;assembly=WPFBinding.EcoSpace"
                  Title="Window2" Height="300" Width="500" >
                  <Window.Resources>
                      <ecoVM:ViewModelContent x:Key="VM1" ViewModelName="GameSetup" EcoSpaceType="{x:Type ecospace:WPFBindingEcoSpace}" ></ecoVM:ViewModelContent>
                      <local:ImageBlobConverter x:Key="ImageBlobConverter"/>
                  </Window.Resources>
                  <Grid>
                      <Grid Name="vmrootStackPanel" DataContext="{StaticResource VM1}">
                          <Grid.ColumnDefinitions>
                              <ColumnDefinition></ColumnDefinition>
                              <ColumnDefinition></ColumnDefinition>
                              <ColumnDefinition Width="50"></ColumnDefinition>
                          </Grid.ColumnDefinitions>
                          <Grid.RowDefinitions>
                              <RowDefinition></RowDefinition>
                              <RowDefinition></RowDefinition>
                              <RowDefinition></RowDefinition>
                              <RowDefinition></RowDefinition>
                              <RowDefinition></RowDefinition>
                              <RowDefinition></RowDefinition>
                              <RowDefinition></RowDefinition>
                              <RowDefinition></RowDefinition>
                          </Grid.RowDefinitions>

                          <TextBlock Grid.Row="0" Grid.Column="0" Text="GAME : " HorizontalAlignment="Right" ></TextBlock>
                          <TextBox Grid.Row="0" Grid.Column="1" Text="{Binding  Path=Class[GameSetup]/Presentation,Mode=OneWay}"></TextBox>

                          <TextBlock Grid.Row="1" Grid.Column="0" Text="Type of game : " HorizontalAlignment="Right" ></TextBlock>
                          <ComboBox Grid.Row="1" Grid.Column="1"  DisplayMemberPath="Name"  ItemsSource="{Binding Path=Class[GameType_PickListPresentation]}" SelectedValuePath="self"  SelectedValue="{Binding Path=Class[GameSetup]/GameType}"  ></ComboBox>

                          <TextBlock Grid.Row="2" Grid.Column="0" Text="Home team : " HorizontalAlignment="Right" ></TextBlock>
                          <ComboBox Grid.Row="2" Grid.Column="1"  DisplayMemberPath="Name"  ItemsSource="{Binding Path=Class[Home_PickListPresentation]}" SelectedValuePath="self"  SelectedValue="{Binding Path=Class[GameSetup]/Home}"></ComboBox>
                          <Image Grid.Row="2" Grid.Column="2"  Source="{Binding Path=Class[GameSetup]/Home_Image,Mode=OneWay,Converter={StaticResource ImageBlobConverter} }"></Image>


                          <TextBlock Grid.Row="3" Grid.Column="0" Text="Visitor team : " HorizontalAlignment="Right" ></TextBlock>
                          <ComboBox Grid.Row="3" Grid.Column="1"  DisplayMemberPath="Name"  ItemsSource="{Binding Path=Class[Visitor_PickListPresentation]}" SelectedValuePath="self"  SelectedValue="{Binding Path=Class[GameSetup]/Visitor}"></ComboBox>
                          <Image Grid.Row="3" Grid.Column="2"  Source="{Binding Path=Class[GameSetup]/Visitor_Image,Mode=OneWay,Converter={StaticResource ImageBlobConverter} }"></Image>

                          <TextBlock Grid.Row="4" Grid.Column="0" Text="Scheduled date : " HorizontalAlignment="Right" ></TextBlock>
                          <Controls:DatePicker Grid.Row="4" Grid.Column="1"  ></Controls:DatePicker><Button Grid.Row="5" Grid.Column="0" IsEnabled="{Binding Path=Class[GameSetup]/CanStartGame}" Click="ButtonStartGame_Click">

                            <TextBlock Text="Start Game"></TextBlock>
                          </Button>
                          <Button  Grid.Row="5" Grid.Column="1"  IsEnabled="{Binding Path=Class[GameSetup]/CanEndGame}" >

              <TextBlock Text="End Game" ></TextBlock> <nowiki></Button>
 </Grid>
        <StackPanel Orientation="Horizontal" VerticalAlignment="Bottom">
           <Image Height="50" Name="imagebrynäs" Stretch="Fill" Width="50" Source="/WPFBinding;component/brynäs.jpg" />
           <Image Height="50" Name="imagedjurgården" Stretch="Fill" Width="50" Source="/WPFBinding;component/djurgården.jpg" />
           <Image Height="50" Name="imageluleå" Stretch="Fill" Width="50" Source="/WPFBinding;component/Luleå.jpg" />
       </StackPanel>
   </Grid>
</Window>
What happens in the XAML above is that we have a ViewModelContent component in the resource section. We initiate it to the name of the ViewModel and also provide the Type of the ecospace.
The ViewModelContent object, now keyed as VM1, is put in the DataContext of the Grid where I placed the UI components. If a WPF Binding does not get an explicit source, it will use whatever it finds in the DataContext (the datacontext is propagated down the logical tree, so for us, it is everywhere).
In code-behind, we hook up the EcoSpace and the rootobject-property (dependencyproperty so that you bind as target and as source) to our demo Game object:
Code Snippet
(Resources["VM1"] as Eco.ViewModel.WPF.ViewModelContent).SetEcoSpace(_es);
(Resources["VM1"] asEco.ViewModel.WPF.ViewModelContent).RootObject=CreateSomeTestData();
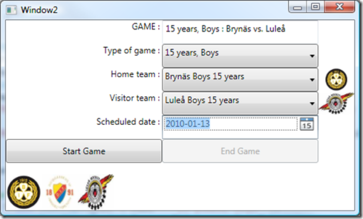
The UI looks like this:
Yes, it looks bad; but hey, you can hand it to any WPF-savvy designer in the world – the data and the rules are safe in the ViewModel.
It already shows some of the good effects of separating UI from logic. If you run the sample, you will see and hopefully appreciate that:
- The PickLists for Home and Visitor are filtered based on the Type of Game
- The Picklist for the Home team filters away the Visitor team if set (and vice versa)
- Start game is enabled only after both home and visitor are set
- The End game button is disabled until the Game is started
These are some examples of business logic that would have ended up in the UI if we did not have a good place to define it.
Taking It Further Still
If the cost of creating and maintaining a ViewModel is high, fewer ViewModels will be created. Our mission is to reduce the cost of creating and maintaining them. Can we do more? I will argue that we can.
WPF is a declarative way to describe the UI. This means that the same basic lookless components like TextBlock, TextBox, CheckBox, Combobox, and Image, etc will be used repeatedly and they will be given a look by an external style or template.
What if we use this fact to provide some basic rendering/placing hints for the ViewModel columns? We could then use those clues to spill out the correct lookless control in the intended relative position - we would not need to mess about with XAML every 5 minutes… I am excited… XAML is a bit too scripty for my old strongly typed ways…
This is what the ViewModel-Editor looks like without rendering hints:
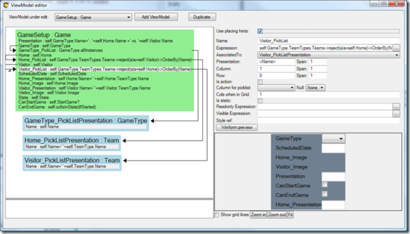
And this is how it looks when I have checked the “Use Placing Hints” checkbox:
Given the extra fields for “Presentation”, “Column”, ”Row”, ”Span” etc, I can work the ViewModel – preview to look like this:
Now, I really need to stress this so that I am not misunderstood: We do not mix presentation with UI; we do however allow for adding optional placing hints or clues on what you have in mind while designing the ViewModel.
When you have a ViewModel with placing hints, you can add a ViewModelWPFUserControl to your form with just one row:
<ecoVM:ViewModelWPFUserControl Grid.Row=”2″ x:Name=”VMU1″
EcoSpaceType=”{x:Type ecospace:WPFBindingEcoSpace}”
ViewModelName=”GameSetup” ></ecoVM:ViewModelWPFUserControl>
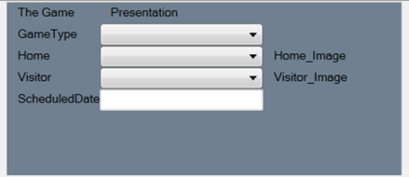
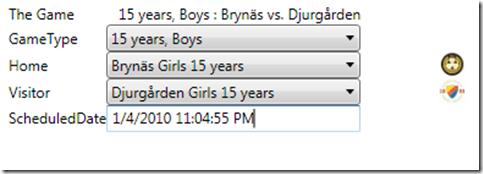
And the result is:
Remember that these auto layout controls also adhere to external set styles. (Notice the Datetime picker is gone? The Datetime picker is in the WPFToolkit so we do not use it by default. Implement ViewModelWPFUserControl.OnColumnUIOverride to add your own components to its layout engine.)
Having the ability to get simple UI automatically derived from the ViewModel placing hints lowers the effort to produce and maintain. Experience has shown that a lot of the administrative parts of your application are left automated so that more time can be spent on the signature screens that are most important for your users.
Summing It Up
This has been a brief overview of the ViewModel concept. Things intentionally left out, for now, are Actions, Validation-rules, Variables, Master-detail (since there were no details in the sample ), Style references, and Tab order.
I have written about the benefits of having a ViewModel in the first place. I also wrote about the Modlr approach with a strictly declarative ViewModel. We looked at the sample using such a ViewModel and some of the effects it gave in separating logic from UI. Then I showed you a ViewModel with placing hints – a bit unorthodox for sure, but efficient and easy to maintain.
Thanks to everyone who has been involved in the Modlr ViewModel approach by giving feedback, and to Rick for providing the sample model – hope I did not misuse it.
The MDriven Book - Next Chapter: Taking It Further Still

